- Published on
Building MCP Servers: A Sample Exercise in Data Processing with AI
- Authors

- Name
- Ajeet Kumar Singh
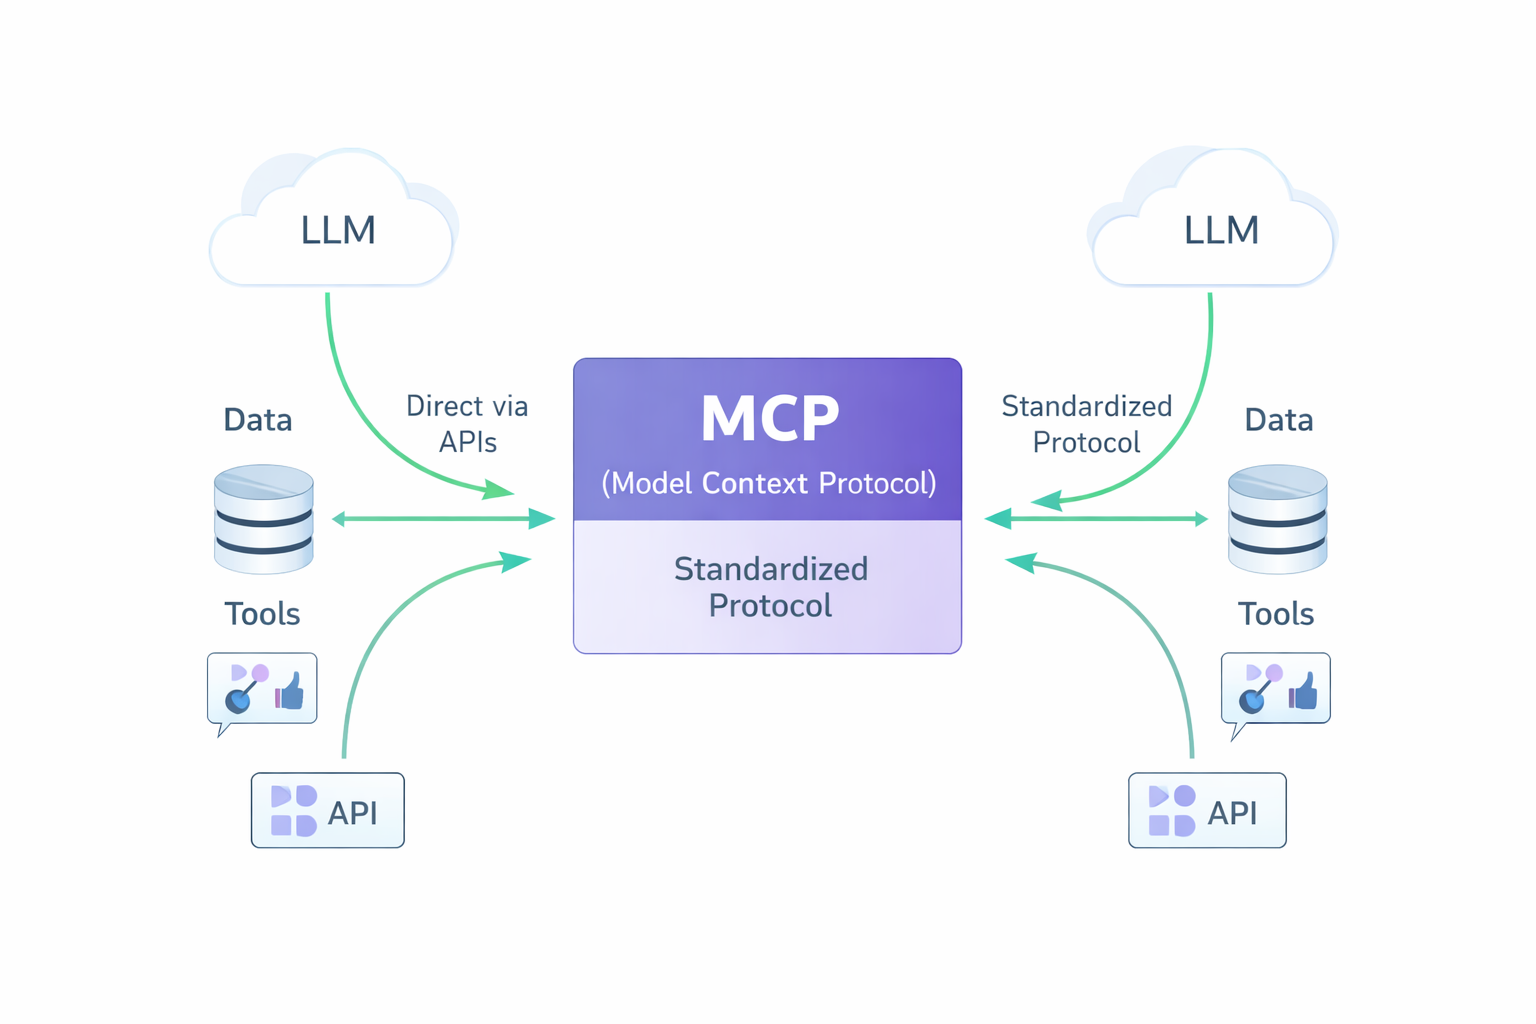
The Model Context Protocol (MCP) creates a bridge between AI tools and data systems. Instead of building separate integrations for each AI tool, you create one MCP server that works with GitHub Copilot, Claude, and other MCP-compatible assistants.
Building a Simple MCP Server
Our sensor data server exposes tools that AI agents can call naturally. Here's the complete implementation:
import mcp
import requests
import json

# Initialize MCP server
mcp_server = mcp.Server("sensor-data-server")

@mcp_server.tool()
def fetch_sensor_data(sensor_id: str) -> str:
    """Fetch raw sensor data for analysis"""
    try:
        response = requests.get(f"https://api.sensors.example.com/v1/sensors/{sensor_id}/data")
        return json.dumps(response.json(), indent=2)
    except Exception as e:
        return json.dumps({"error": str(e)})

@mcp_server.tool()
def get_data_summary(sensor_id: str) -> str:
    """Get statistical summary of sensor data"""
    # Implementation here
    return json.dumps({"sensor_id": sensor_id, "status": "processed"})

if __name__ == "__main__":
    mcp_server.run()
Once configured, you can ask GitHub Copilot to "get temperature sensor data" or "analyze sensor readings" using natural language. The AI automatically selects the right tool and presents results in a helpful format.
VS Code Configuration & GitHub Copilot Integration
Integrating your MCP server with GitHub Copilot in VS Code creates a powerful development environment where AI can naturally access your data sources. The setup requires uv (a fast Python package manager) and the MCP library. The uv tool handles dependency management and Python environment isolation, while mcp provides the protocol implementation for connecting AI agents to your server.
The integration works through VS Code's MCP extension, which bridges your server with GitHub Copilot Chat. Once configured, Copilot can discover and use your sensor data tools automatically, complete with parameter documentation and error handling.
Configuration Setup
Create .vscode/mcp.json in your workspace:
{
  "servers": {
    "sensor-data-mcp": {
      "type": "stdio",
      "command": "~/.local/bin/uv",
      "args": ["run", "--with", "mcp", "--with", "requests", "mcp", "run", "./src/server.py"]
    }
  }
}
This configuration tells VS Code to launch your MCP server using uv, which automatically installs the required packages (mcp for the protocol and requests for HTTP calls) in an isolated environment. The stdio transport method allows seamless communication between VS Code and your server process.
GitHub Copilot Integration Process
When you start a conversation in GitHub Copilot Chat, the AI assistant automatically discovers your MCP tools and their capabilities. Copilot reads the docstrings from your @mcp.tool() decorators and understands what each function does, what parameters it expects, and what kind of data it returns.
For example, when you ask Copilot to "analyze the temperature sensor data," it intelligently chooses between fetch_sensor_data for raw readings or get_data_summary for statistical analysis. The AI can even chain multiple tool calls together for complex queries, such as fetching data from multiple sensors and comparing their readings.
Setup Process
Use VS Code's command palette (Cmd+Shift+P) and search for "MCP: Add Server" to configure through the UI, or create the configuration file manually. Always choose workspace scope to keep the setup isolated to your project and prevent conflicts with other MCP servers.
Once configured, restart VS Code or reload the window. Your sensor data tools will appear in GitHub Copilot Chat with full documentation, parameter hints, and intelligent suggestions. The integration is seamless—Copilot treats your custom tools as naturally as its built-in capabilities, enabling powerful data analysis workflows through simple conversational queries.
Design Principles for MCP Success
Effective MCP tools follow several key principles. Each tool should have a single, focused responsibility rather than trying to handle multiple unrelated tasks. Clear documentation in your docstrings becomes the tool descriptions that AI agents see, so invest time in writing helpful explanations.
Error handling deserves special attention. Always return structured JSON responses, even for errors, so AI agents can interpret and present failures gracefully to users. Input validation should happen early and provide specific feedback about what went wrong.
Consistency in response formats helps AI agents work more effectively with your tools. Whether returning success data or error messages, use the same JSON structure and field names throughout your server implementation.
Conclusion
MCP represents a fundamental shift in how we build AI-data integrations. By standardizing the protocol and focusing on tool-level abstractions, we can create reusable, composable data processing pipelines that work seamlessly with any MCP-compatible AI agent.
Our sample MCP server demonstrates that data workflows can be simplified into natural language interactions for learning and prototyping purposes. This exercise shows how to build a basic data analysis pipeline using MCP concepts.
Key takeaway: MCP isn't just about connecting AI to data—it's about reimagining how we interact with complex systems. When done right, the technology disappears, and we can focus on insights, analysis, and decision-making.
The future of data analysis is conversational, intelligent, and built on standards like MCP that enable true AI-human collaboration.
This post demonstrates a practical MCP implementation for data processing workflows. All examples show typical API responses and generated outputs from a generic data processing system for educational purposes.